Sunday, December 11, 2011

Handy Little Tricks...

In my many afternoons spent on pinterest, I have learned some very handy tricks!  After sharing an evening with friends... I learned that these handy little tricks are not known by all!  However, I also learned that many people want to know these tricks, so I thought I would write a blog about a few of my favorites!  I have not tried them all, but I do plan to try them if I ever need them! So here you go...


1.  If you place a wooden spoon on top of a pot of boiling water, the pot will not boil over!


2.  If you aren’t sure how fresh your eggs are, place them in about four inches of water. Eggs that stay on the bottom are fresh. If only one end tips up, the egg is less fresh and should be used soon. If it floats, it’s past the fresh stage.


3.  To banish ants from the kitchen, find out where they are coming in and cover the hole with petroleum jelly. Ants won’t trek through the jelly. If they are coming under a door, draw a line on the floor with chalk. The little bugs also won’t cross a line of chalk.

  
4.  When defrosting meat from the freezer, pour some vinegar over it. Not only does it tenderize the meat; it will also bring down the freezing temperature of the meat and cause it to thaw quicker.


5.  Fill a plastic baggy with distilled white vinegar and place it over a dirty shower head.  Secure it with a rubber band and leave it for 1 hour!  Sparkly clean when you return!


6.  Activated charcoal is much better at absorbing fridge and freezer odors than baking soda!

7.  When you burn yourself in the kitchen... if you don't have an aloe plant, spread mustard on the affected area.  Leave it for a while and it will ease the paint & prevent blistering.


8.  Place a few large marshmallows in your bag of brown sugar.  Place it in a sealed container, and your brown sugar will stay soft!

8.  Keep old Starbucks cups to reuse as spill proof paint cups!


9.  Dry up grease stains on clothes with white chalk!  Rub on as a pre-treat, and the grease stains will come right out!


10. Take one capful of Hydrogen Peroxide (the little white cap that comes with the bottle) and hold in your mouth for 10 minutes daily, then spit it out. No more canker sores and your teeth will be whiter without expensive pastes. Use it instead of mouthwash. (Small print says mouth wash and gargle right on the bottle).

11.  Place a pillow case over fan blades, and slide off holding the blade.  Your fan gets dusted and all of the nastiness goes into the pillow case!  Flip it inside out, outside & shake it out.  Then wash the pillow case!


12.  Putting a slice of bread in the cookie jar will keep your cookies fresh!


13.  If you accidentally write on a dry erase board with a permanent marker, just write over it with a dry erase pen!  It wipes right off!!  If that doesn't work, a magic eraser will remove just about anything!


14.  Toothpaste on a pimple before bed will take away the redness over night!


15.  You can also use toothpaste to fill in small holes in the wall!  Don't have any wall putty??  Just use a touch of toothpaste, dry, and wipe it off!


I am sure that I don't know all of the handy tricks that are out there, but I always love to hear about them!  If you know any that I missed... please comment below!  I am excited to learn some new tricks!!


 - Jessica

Cookie Swappin'

Tonight I attended my first Cookie Swap in our new hometown!  I had such a great time with the ladies of my small group!  I decided that the cookies I wanted to bring were my favorite cookie from my childhood!  My mom used to make these cookies EVERY year, and they were always my favorite!  They are called Chocolate Chocolate Chocolate Chip Cookies!  I have a hard time cutting myself off from eating too many of these cookies! 

There were 7 of us total, and we snacked, told all kinds of stories, and of course swapped cookies!  The rules for the exchange were established by our host, Jessie (and a fabulous host she was!!).  They were as follows...
  • All cookies should be homemade, baked, and the main ingredient should be flour.
  • No plain chocolate chip cookies or cookie mixes.  
  • Once you have decided what type of cookie you would like to bring, email me, to 
  • make sure we don't have duplicates.
  • Please bring 6 dozen total cookies.
  • Arrange cookies in a basket or platter and be creative!  Bring a large container to carry away your cookies.
  • Email a copy of your recipe before the party (if you would like to share).
Well, if you know me... you know that I am about 10 weeks away from my due date... and the exhaustion and fatigue is starting to kick in!  I had absolutely no intention of "getting creative"!  6 dozen homemade cookies was going to be enough work!  However, my WONDERFUL husband offered to back the cookies, and Thursday evening at our small group... someone told me "I cant wait to see what crafty display you come up with"!  That felt like a challenge, and I had to rise to the occasion!  So, you all know that my crafty sense kicked into overdrive!  Now that I didnt have to make the cookies... I had plenty of time to get creative! 

I went back and forth on how I wanted to display the cookies, but I finally landed on an idea!  I have 2 plastic 12x12 containers with attached lids that I file scrapbooking paper in!  I cleaned one out, lined it with Christmas tissue paper, and put down a cloth napkin, so that the cookies would not stick to the tissue paper!  The lid to the box doesn't come off, and I wanted to have something cute to put there!  I had recieved in an email "Santa's Christmas Prayer" and I loved it!  So, I typed it up, and printed it out on cardstock.  Then I mounted that to Christmas scrapbook paper, and taped it to the lid. 

I put a contrasting piece of Christmas scrapbook paper on the back side, so that when the 
lid was closed... it still looked pretty!  I printed out a label with the type of cookie I had 
made and stuck it on the outside of the lid as well! 


We stacked the cookies in 6 rows of 12, so that they fit in the box every so beautifully!
I also created a cut way to display my recipes!  

I clearly didn't read the rules well enough to learn that I should email the recipe!! 
So, I took a wine bottle and wrapped it in Christmas paper.  I found this gold "spray" at Target that people usually stick in their Christmas trees for a couple bucks and stuck it down into the empty bottle!  I used some of the same paper to make an "apron pocket"!  It was pretty simple, and of course I got the idea from pinterest!  I printed out my recipes and put them in the pocket!  Then I hung the apron on the spray!
It seemed to be a hit, even though I am the only one who brought recipes!!  
Everyone else must have read the rules!!

There were lots of delicious cookies at the exchange, and it was fun to here why everyone decided to make them, as well as the stories of disasters in the kitchen while making them!

SO YUMMY!!  Looking forward to my next cookie swap!

-Jessica

Friday, December 9, 2011

Holiday Guests...

The holiday season is really here!  Many of you may have had guests staying with you over Thanksgiving, and some of you may have guests coming for Christmas.  I thought I would mention a few of the "budget friendly" ideas that I use when we have company, to make them feel special!

I like to make sure that my guests feel at home.  There are a few things that I have learned about hosting company, many of which I learned from my fabulous Aunt Melissa!! 


This is our guest room!  I love this room... and Derik wishes it was our room!
A few highlight items that make a great statement, and cost next to nothing are...

Put a heavy blanket on the bottom of the bed.
Most of us have extra blankets, quilts, or comfortors.  They don't have to match!  Not every guest that stays with you will like the temperature at which you keep your home!  The comforter on our bed is light weight, and I used an old comforter which is much heavier on the end of the bed.  Now everyone can sleep at the temperature they prefer!

Use sheer curtains on the windows.
Again, not everyone likes a dark room or a lit room when they sleep.  I feel the sheer curtains, allow enough light in the room for people who like it dimly lit, and closing them does actually make the room darker for those who like a dark room.  Sheer curtains are usually very inexpensive, and these came from the clearance section at Wal-Mart!  I think I paid $3 a panel!  
Leave out towels & washcloths.

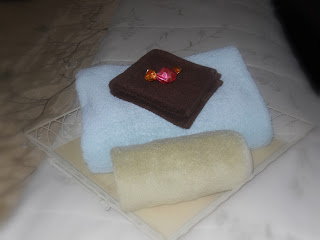
This is something that is so simple to do, and actually makes people feel special!  I found a tray that we got several years ago and never could find a purpose for in the top of a closet!  I use this tray on the end of the bed to set out towels and washcloths for each guest that is staying!  When I have one guest coming, I leave one towel, one washcloth, and one hand towel on the tray.  When I have two guests coming, I leave 2 towels, 2 washcloths, and one hand towel on the tray.  This way they guests have what they need when it is time to shower, and they know that the hand towel is clean!
In addition to the towels, I leave a chocolate for each guest on the arrangement!  It is the icing on the cake, and really makes every guest feel like they are being pampered!  I wait for bags of the Lindor or Godiva truffles to go on sale, and I will purchase 1 or 2!  Guests don't come THAT frequently, so I don't go through the bag that quickly! 

Keep a stash of guest toiletries!
This has been incredibly easy to do, and very inexpensive!
Anytime you visit a hotel, keep the toiletries that you are given!  Keep your stash in a box, along with a few extra toothbrushes, travel tubes of toothpaste, disposable razors, and travel bottles of shaving cream!  You can get most of those items for a $1 in the "travel section" at Target!  I put out a Shampoo, Conditioner, and Lotion... and once they have been used... I replace them!  It's not often that someone stays with us and needs something, but when they do... we are prepared!


Create a place to hang their towels.
I found these "H" hooks in the $1 section at Michaels!  I picked out some scrapbook paper, traced it, cut it out and glued it to the H!  I printed out a HIS and HERS sign on the computer, and made them a little snazzy with a bow and a few buttons... and BAM!  SO EASY, and SO CHEAP!  

However, when guests come they now have a place to hang their bath towels, and it is in their space. 


I have a few other ideas that I plan to implement in the future, but for now... this system works!  My guests seem to enjoy their stay, and we enjoy having them!  
I hope you have a GREAT Christmas holiday with all of your guests!

 - Jessica

Tuesday, December 6, 2011

Potato Soup in a Jar!

SPOILER ALERT - I am sure that some of my readers are going to be receiving the following project as a Christmas gift!  I apologize in advance for spoiling the surprise, and we hope that you enjoy!!

Every year I write out the list of people that we would like to give gifts to!  Each year Derik and I stare at each other and say "What are we going to get them?!?!".  So, I decided making Potato Soup Jars would be an easy and fun gift to give to our couple friends... and it wouldn't be expensive or ultra time consuming!  It's dinner for a family of 4!  Making the jars took me about 30 min, the tags another 30 min, and getting them "finished" another 30 minutes.  So, this project took me about an hour and a half to get finished!  Of course I had to go get everything to put the jars together!  So, I made my shopping list and headed to the store!

List
  • 1 Case of 12 Quart Size mason jars - (I got the Better Homes & Garden brand, because the lids looked like Christmas and they were cheaper than the Ball jars!)
  • 2 Spools of green Ribbon
  • 2 Large Boxes of Instant Potatoes
  • 5 Sprinkle Cheese Shakers (only used 3)
  • 4 Containers of Freeze Dried Chives (only used 2)
  • 1 Container of Chicken Bouillon Cubes
  • 1 White Pepper Spice
  • 1 Dried Mustard Spice
  • 7 Bags of Herbed Croutons... depends on what size you are buying... you need 18 cups total!

After picking up all of the products, I headed home to get to work!  After wiping all of the jars and lids down... I used a canning funnel and layered the ingredients as followed


Ingredients

  • 2 Cups of Instant Mashed Potatoes
  • 1/8 cup of Sprinkle Cheese
  • 1 Tbspn Dried Chives
  • 1 Tspn Chicken Bouillon Cubes (Ground up... I just used my Pampered Chef chopper!)
  • 1/2 Tspn Dry Mustard
  • 1/4 Tspn White Pepper
  • and then filled the remainder of the jar with croutons, about 1 1/2 Cups...

The jar is ready for decorating!!


I created labels with instructions and ingredients on Avery Labels that I already owned!  

I picked out some Christmas scrapbook paper, and used my paper cutter to cut it down to 4"x4 1/2" so that it was bigger than the Avery Label.  

I stuck an Ingredients list on the front, and a Directions List on the back!  

Then I simply punched a hole in the tag, and tied it onto the jar using the green ribbon, 
which I had cut into strips!

This was really pretty easy, and it was very cost effective!

Cost -
Jars - $8
Ribbon - $.94
Potatoes - $5.16
Cheese - $5.07
Chives - $4.78
Boullion -$2
Dry Mustard - $2.53
White Pepper - $2.18
Croutons - $11.13

Total Cost of Project was $41.79, but when you divide that by 12, we only spent about $3.50 on each jar!  That means I got 12 Christmas presents for about $40!!  That is good spending! 

 - Jessica

Monday, December 5, 2011

Santa List Ornament

I know that everyone has their own "Santa Tradition", but in our house... we don't want Santa to take over the holiday!  Derik and I decided after last Christmas that our children would be allowed to ask Santa for 5 things, and each year Santa will bring 3.  We bought Santa bags, and Santa will leave each child a bag with their 3 gifts every year!  We thought this would be a good way to incorporate the story of Jesus into Christmas... the wise men brought Jesus 3 gifts as well!  This way... everything comes back to the real meaning of Christmas. 

I saw an idea on pinterest, and I had to make it mine!  The idea was to use wooden spools to create an ornament with your child's wishlist for Santa on it.  So, off to JoAnns I went (coupon in hand of course)!! 

I only had to purchase 2 items, wooden spools, and twine! 

I found the spools in a pack of 6 amongst the wood crafts, 
and a package of hemp twine in the jewelry department!

I wanted an ornament for last year's Christmas as well, so I needed to make 2.  Even making 2, this project took about 15 minutes!  I painted the spools red, and waited for them to dry.  After putting my daughter to bed, created a Word Document and inserted a text box.  The size of the spool was 1 1/2" wide, so I made the text box 1 1/2" x 4.5" tall.  I typed a small "letter" to Santa from Abbie including her 5 wishlist items, printed them, and cut them out!  I ran twine through the spool and tied a knot in the end.  Taped on the list, and voila!  I created a Santa's List Ornament!  I will make one each year for each child! 

It was a lot of fun to hang them on the tree, and one day... I will give them all of their spools!!


Wooden Spools $2.57 with my coupon!
Twine $1.99

Total Cost of this project $4.50 (and I have another 2 years worth of spools!!)

 - Jessica